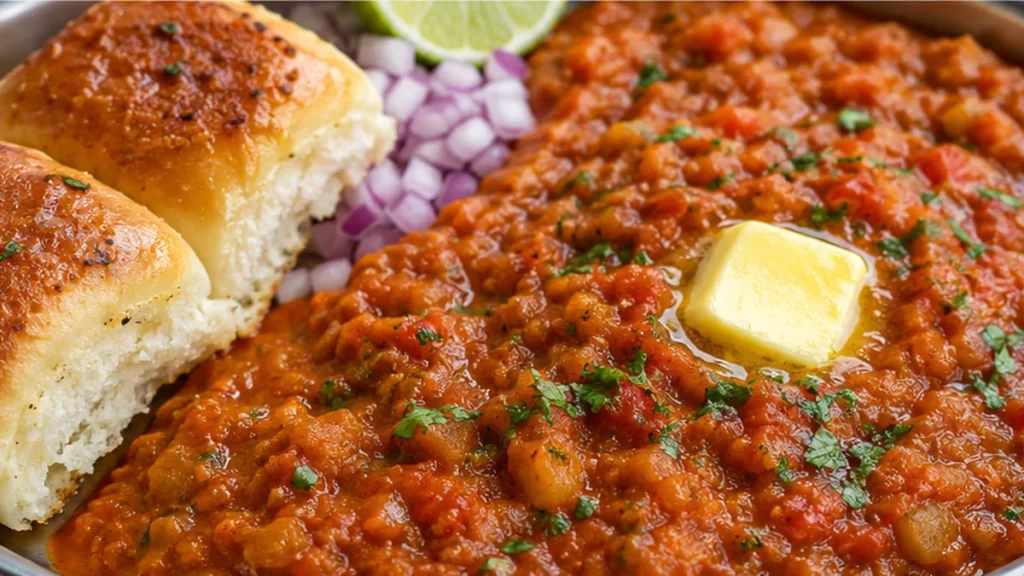
Pav bhaji is a beloved Indian street food classic, originating from Mumbai. This iconic dish features a spicy, flavorful mashed vegetable curry (bhaji) served with soft, butter-toasted dinner rolls (pav). It’s a mix of textures and tastes, making it a go-to comfort food for millions. Our recipe breaks down how to achieve that authentic street-side flavor right in your own kitchen, focusing on fresh ingredients and a balanced spice blend. This pav bhaji recipe is perfect for a hearty lunch or dinner. It’s adaptable to your spice preference and uses readily available vegetables. Get ready to recreate the bright experience of Mumbai’s bustling food stalls.
Key takeaways
- Use salted butter for richness and emulsification.
- Uniform vegetable preparation ensures even cooking and texture.
- Proper sautéing of spices enhances flavor through the Maillard reaction.
- Adjust cooking times to prevent watery or overly chunky bhaji.
Pav Bhaji: Mumbai Street Food Delight
Ingredients
- 2 to 4 tablespoons salted butter (plus 4 tablespoons, at room temperature)
- 1 large yellow onion (finely diced)
- ½ green bell pepper (seeded and diced)
- ½ red bell pepper (seeded and diced)
- 1 tablespoon ginger (grated)
- 1 tablespoon garlic (minced)
- 5 cups cauliflower florets (1-inch florets)
- 2 large Yukon gold potatoes (peeled and cut into 1-inch cubes)
- 3 plum tomatoes (cored and diced)
- ½ cup frozen green peas
Instructions
- Heat 2 tablespoons of salted butter in the Instant Pot on high Sauté setting. Add yellow onion, ginger, garlic, and bell peppers; sauté until onion is translucent, about 5 minutes.
- Add cauliflower, potatoes, tomatoes, peas, and 2 teaspoons salt. Pour in water and stir well, scraping any browned bits from the pot.
- Secure the lid, set Pressure Release to Sealing, and cook on high pressure for 6 minutes.
- Perform a quick release, then mash the veggies with a potato masher. Stir in tomato paste, pav bhaji masala, red chile powder, turmeric, and 2 tablespoons butter.
- Cover and cook on Sauté until heated through, about 5 minutes. Adjust seasoning with salt and spices as needed.
- Spread remaining butter on the cut side of each bun and toast on a griddle until golden brown, about 2-3 minutes per side.
- Serve bhaji on plates, topped with red onion, alongside toasted buns and lime wedges.
Video
Notes
Understanding the Role of Butter in Pav Bhaji
The use of butter in pav bhaji is crucial for achieving its signature richness and flavor. Typically, 2 to 4 tablespoons of salted butter are used during cooking, with an additional 4 tablespoons added at the end. This method enhances the dish’s creaminess and helps in emulsifying the ingredients, creating a cohesive texture. The ideal temperature for cooking is medium heat (about 350°F or 175°C), allowing the butter to melt without burning, which can lead to a bitter taste.
Importance of Vegetable Preparation
Proper preparation of vegetables is vital for the texture and taste of pav bhaji. The cauliflower should be cut into uniform 1-inch florets to ensure even cooking. The Yukon gold potatoes, when cubed similarly, contribute a creamy consistency once mashed. Cooking these vegetables until they are fork-tender (approximately 15-20 minutes) is essential; undercooked vegetables will result in a grainy texture, while overcooked ones may become mushy.
Why Spices Matter in Balancing Flavors
The spices used in pav bhaji, including ginger, garlic, and the blend of spices like pav bhaji masala, play a crucial role in flavor development. The Maillard reaction occurs when these ingredients are sautéed, creating complex flavors. Aim for a sautéing time of 5-7 minutes until the onions are translucent and aromatic. This step enhances the overall depth of flavor, making the dish more enticing.
Common Mistakes and How to Avoid Them
- Too Watery Bhaji: If the bhaji becomes too watery, it may be due to excess liquid from the tomatoes. To fix this, cook the mixture uncovered for an additional 5-10 minutes to allow evaporation.
- Inconsistent Texture: If the bhaji is too chunky, ensure all vegetables are evenly diced and cooked thoroughly. Use a masher to achieve a smoother consistency.
- Flavor Imbalance: If the bhaji lacks flavor, it may not have been cooked long enough. Allow it to simmer for at least 10 minutes after adding spices to meld the flavors.
- Overly Spicy: If the dish is too spicy, balance it with a bit of sugar or additional butter to mellow the heat.
Ingredient Substitutions and Their Effects
- Yukon Gold Potatoes: Substitute with russet potatoes for a fluffier texture, but expect a slightly drier bhaji.
- Frozen Peas: Fresh peas can be used instead, providing a fresher taste but requiring a longer cooking time.
- Bell Peppers: Swap with zucchini for a different flavor profile, but this may alter the overall color and sweetness.
- Butter: Use ghee for a richer, nutty flavor, but it may change the dish’s traditional taste.
Understanding the Impact of Ingredient Freshness on Pav Bhaji
The quality of vegetables used in pav bhaji significantly affects the final flavor and texture. Fresh, seasonal produce enhances the dish’s taste, while older vegetables may lead to a mushy consistency. For instance, using fresh tomatoes adds a vibrant acidity, which balances the richness of the butter. Aim for firm, brightly colored vegetables. When shopping, prioritize local markets where produce is likely fresher. The ideal vegetables for pav bhaji include firm potatoes, bright green peas, and fresh cauliflower that is not wilted. This attention to ingredient quality ensures a more flavorful and enjoyable dish.
Batch Scaling: How to Adjust Portions Without Compromising Flavor
Scaling the recipe for pav bhaji can be tricky, as the balance of flavors is crucial. When increasing the quantity, maintain the same ratios of spices and butter to vegetables. For instance, if doubling the recipe, use 8 tablespoons of butter and double the spices accordingly. However, be cautious with the cooking time; larger batches may require additional time for the flavors to meld. A general rule is to increase cooking time by about 10-15 minutes for every double batch. This ensures that each ingredient has enough time to soften and integrate, preserving the dish’s signature taste.
Equipment Choices: The Best Tools for Perfecting Pav Bhaji
The right equipment can make a significant difference in preparing pav bhaji. A heavy-bottomed pan or kadhai is ideal for even heat distribution, preventing burning. A potato masher or a hand blender can be used to achieve the desired consistency of the bhaji, whether chunky or smooth. Additionally, using a flat griddle (tawa) for toasting pav ensures a crispy exterior while keeping the inside soft. If using a pressure cooker, be mindful of the cooking time to avoid overcooking the vegetables, which can lead to a less appealing texture. The choice of tools can enhance the efficiency and outcome of your dish.
Serving Pav Bhaji: Ideal Accompaniments and Presentation Tips
When serving pav bhaji, presentation can elevate the dining experience. Traditionally, it is served with a dollop of butter on top of the bhaji, garnished with finely chopped onions and fresh coriander. Pair it with soft pav, lightly toasted with butter, to balance the flavors. Consider adding a side of tangy lemon wedges and a spicy green chutney for an extra flavor kick. For a complete meal, serve with crispy papad or a refreshing cucumber salad. The right accompaniments not only enhance the dish but also create a visually appealing platter that invites enjoyment.
How to Ensure Your Pav Bhaji Stays Flavorful When Made Ahead
Pav bhaji can be made ahead of time, but the key to preserving its flavor lies in proper storage. Once cooked, allow the bhaji to cool to room temperature before transferring it to an airtight container. Refrigerate it for up to 3 days. When reheating, add a little water to maintain moisture and reintroduce some of the fresh spices to revitalize the flavors. If you plan to freeze it, ensure it cools completely before freezing in portions. Thaw overnight in the refrigerator before reheating. This method helps retain the integrity of the vegetables and the overall taste of the dish.
How to Adjust Serving Sizes Without Compromising Taste
Scaling the batch size of pav bhaji can be tricky, especially if you want to maintain the balance of flavors. When doubling or halving the recipe, keep the ratios of the spices consistent. For instance, if you double the amount of vegetables, also double the butter and spices. However, be cautious with salt; start with the original amount and adjust to taste. Cooking time may also change; larger batches may require longer cooking to achieve the desired consistency. Using a larger pot can help distribute heat evenly, avoiding overcooked or undercooked portions.
Why the Right Equipment Matters for Perfect Pav Bhaji
The choice of equipment can significantly affect the outcome of pav bhaji. A heavy-bottomed pan or kadhai is essential for even heat distribution, preventing burning. A potato masher specifically designed for thick mixtures is ideal for achieving the perfect texture without over-mashing the vegetables. Additionally, using a flat spatula can help in mixing the bhaji uniformly. If using an electric pressure cooker, it can speed up the cooking process, but be mindful of the consistency; it may require adjustments in liquid content. Each piece of equipment can bring out different textures and flavors, so choose wisely based on your desired outcome.
Why the texture of pav bhaji can vary and how to achieve the perfect consistency
The texture of pav bhaji is crucial for a satisfying experience. To achieve the ideal consistency, ensure that the vegetables are cooked until soft but not mushy. This usually takes about 15-20 minutes of simmering after adding the tomatoes. Use a potato masher to blend the vegetables into a smooth yet chunky mixture. If the bhaji is too thick, add a splash of water or vegetable stock to loosen it. Conversely, if it becomes too thin, allow it to simmer uncovered for a few extra minutes to evaporate excess moisture. Aim for a final consistency that is spreadable but not runny, resembling a thick soup.
Why the choice of bread matters for authentic pav bhaji
The bread served with pav bhaji, known as pav, plays a significant role in the overall dish. Authentic pav is soft, fluffy, and slightly sweet, made from refined flour. When toasting, use a generous amount of butter to enhance flavor and achieve a golden-brown crust. If using bread alternatives, such as whole wheat or gluten-free options, be aware that they may not provide the same texture or flavor profile. Whole wheat bread may be denser, while gluten-free bread can become crumbly. For best results, stick to traditional pav or soft dinner rolls, which complement the rich bhaji perfectly.
Pro tips
- For authentic flavor, use a good quality Pav Bhaji Masala. Adjust spice levels to your preference.
- Don’t skip toasting the pav in butter; it’s crucial for the dish’s character.
- If you don’t have an Instant Pot, you can boil the vegetables in a regular pot until tender, then mash and simmer with spices.
Enjoy this taste of Mumbai! Serve hot with extra butter on the pav and a squeeze of lime.
Frequently asked questions
What is the best way to serve pav bhaji?
Pav bhaji is best served hot with buttered and toasted pav (bread rolls) on the side. Garnish with chopped onions, cilantro, and a squeeze of lemon for added freshness.
Can I make pav bhaji vegan?
Yes, you can easily make pav bhaji vegan by substituting the butter with a plant-based alternative, such as coconut oil or vegan butter, while keeping the other ingredients the same.
How can I store leftover pav bhaji?
Store leftover pav bhaji in an airtight container in the refrigerator for up to 3 days. Reheat on the stovetop or in the microwave before serving, adding a splash of water if it thickens.
What spices are essential for authentic pav bhaji?
Essential spices include pav bhaji masala, cumin, turmeric, and red chili powder. These spices create the distinct flavor profile that defines authentic pav bhaji.
More from Vegetable & Bean Soups →