How to make miso soup with miso paste comes down to one tablespoon of paste per cup of warm liquid, dissolved gently off the heat so it never boils. That is the whole secret. Miso paste is a living, fermented food, and the flavor you bought it for is fragile: a hard boil flattens its aroma and dulls the savory edge, while a careful, low-temperature finish keeps every bit of it. Warm your liquid, whisk a spoonful of paste until smooth, stir it in with the heat off, and you have a real bowl of miso soup in the time it takes to toast bread.
This guide is about the paste itself, the part most recipes rush past. You will get the exact ratio per bowl, three ways to dissolve it without lumps, which type of miso to reach for, how to build a quick soup even without traditional dashi, and how to fix a bowl that came out too salty, grainy, or flat. If you want the deeper dive into the stock that sits underneath a classic bowl, my full walkthrough on how to make miso soup the authentic way covers dashi in detail; here the focus is on getting the most out of the jar of paste in your fridge.
What Miso Paste Actually Is
Miso is a thick, savory paste made by fermenting soybeans with salt and a culture called koji, usually along with rice or barley. That fermentation is what gives miso its deep, salty, faintly sweet, intensely savory character, the glutamate-rich umami that makes the soup so satisfying. Because miso is fermented and alive, it carries flavor compounds and beneficial enzymes that are sensitive to high heat. This is the single fact that drives every technique in this article: treat the paste gently and it rewards you, boil it and you waste it.
A jar of miso keeps in the fridge for months, even up to a year, because the salt and fermentation act as preservatives. That makes it one of the best flavor investments you can keep on hand. A spoonful turns warm water, broth, or dashi into soup, and it also seasons dressings, marinades, glazes, and braises.
The Ratio: How Much Miso Paste Per Bowl

The Japanese rule of thumb is clean and easy to remember: about one tablespoon of miso paste per one cup, roughly 200 milliliters, of liquid. That gives a balanced, properly seasoned bowl. From there you adjust to taste and to the type of miso, because saltiness varies a lot between pastes.
Notice the four-bowl batch starts a little below a strict one-per-cup ratio. That is deliberate: it is easier to add more paste than to fix an over-salted pot. Start at the lower end, taste, and stir in more if it needs it. Saltier red misos may need slightly less than mild white ones to reach the same seasoning.
The reason taste-as-you-go matters so much is that miso brands vary widely in salt content and intensity. Two pastes labeled white miso can be quite different, and a long-fermented red can be nearly twice as assertive as a mellow shiro. The tablespoon-per-cup guideline gets you in the right neighborhood; your tongue gets you the rest of the way. Once you find a paste you like, note how much you used for your usual pot and you will rarely need to measure again. This is also why it pays to add the paste in two stages for a big batch: stir in most of it, taste, then add the last of it to dial in the seasoning exactly.
Dissolving the Paste Without Lumps
If you drop a spoonful of paste straight into the pot and stir, you will end up with stubborn little clumps floating in an under-seasoned broth. Miso needs to be dissolved into liquid before it joins the soup. There are three reliable ways to do it, all easy.
- The ladle method: hold a ladle in the warm soup, drop the paste into the ladle, and stir it with chopsticks or a small whisk until it dissolves into the bit of liquid in the ladle, then release it into the pot. Simple and clean.
- The miso strainer: a small fine-mesh strainer made for this job. Put the paste in the strainer, lower it into the soup, and press and stir with a spoon so only smooth dissolved miso passes through, leaving any grain behind. The fastest, lump-free option.
- The small bowl method: spoon the paste into a small bowl, add a few tablespoons of the warm liquid, and whisk to a smooth slurry before stirring it back into the pot. The easiest if you have no special tools.
Whichever you use, the principle is the same: thin the thick paste with a little liquid first so it disperses evenly. Never just plop and stir.
The No-Boil Rule
This is the rule that matters most, so it gets its own section. Once the miso paste is in, do not let the soup boil. Heat your liquid to a gentle simmer, then turn the heat off before you add the dissolved paste. Boiling miso drives off its delicate aroma, mutes the savory depth, and can make the texture grainy as the proteins seize. A bowl of miso soup that has been boiled tastes harsh and one-dimensional compared to one finished off the heat.
Practically, this means miso always goes in last. Cook your tofu, seaweed, and vegetables in the hot liquid first, then kill the heat, dissolve in the paste, and serve right away. If you need to reheat leftover miso soup, warm it gently and stop well before it bubbles. The same restraint that protects a delicate finish applies across Japanese soups; the team at Bon Appetit makes the same point about adding miso off the heat to preserve its character.
Choosing Your Miso Paste
The color of miso tells you roughly how long it fermented and how bold it will taste. The longer the ferment, the darker and more intense the paste.
If you are buying your first jar, get white or awase miso. Both are forgiving, widely available, and make a crowd-pleasing bowl. Keep the lid pressed flat against the surface of the paste to limit air exposure, and the jar will last for months in the fridge.
Building the Soup: Liquid, Paste, and Add-Ins
A classic miso soup is dashi plus miso, finished with a few add-ins. But the paste is forgiving enough to make a quick, satisfying bowl over other warm liquids too. Here is the order of operations no matter which liquid you use:
- Warm the liquid: dashi for the authentic version, or a light vegetable or chicken broth, or even plain water in a pinch. Bring it to a gentle simmer.
- Cook the firm add-ins: cubed tofu, a pinch of dried wakame seaweed (it rehydrates and expands fast), thinly sliced mushrooms, or sturdy greens. A minute or two is plenty.
- Kill the heat: turn off the burner completely.
- Dissolve and add the paste: using one of the three methods above.
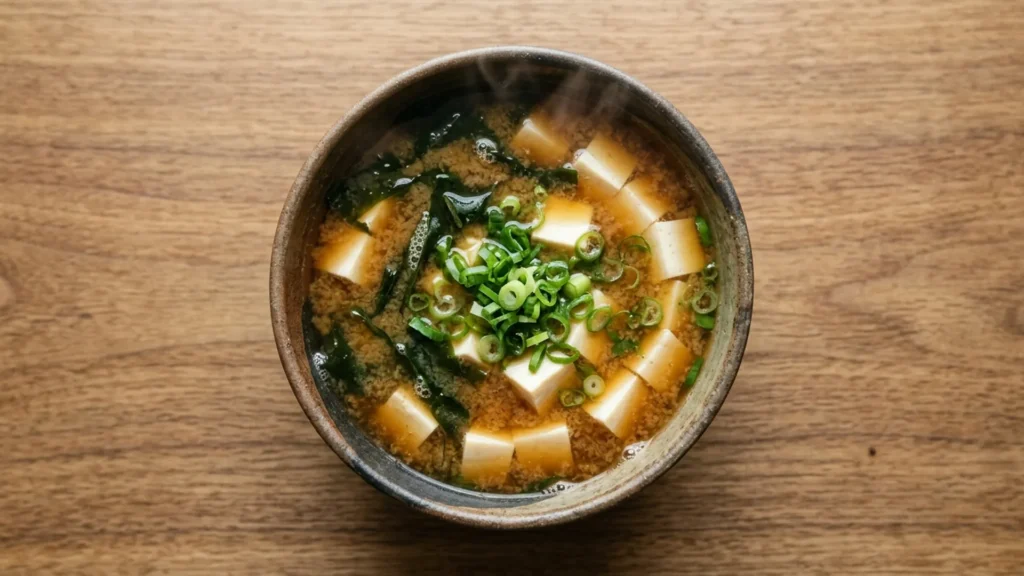
- Finish: scatter sliced scallions over the top and serve immediately.
Silken tofu is the traditional choice and goes in late so it does not break apart. Wakame is the classic seaweed; a teaspoon of the dried flakes swells into a generous amount, so go light. For step-by-step photos of each add-in and the traditional dashi base, Just One Cookbook is the most reliable home-cooking reference.
Making Miso Soup Without Dashi
You can absolutely make a good quick bowl using only miso paste and water, and it is far better than skipping soup altogether. Plain water plus miso gives you a clean, paste-forward soup; it will not have the layered umami of a dashi-based bowl, but it is honest and quick. To close some of that gap without making dashi from scratch, you have a few easy boosters: a pinch of instant dashi powder, a small square of kombu steeped in the warming water and removed before it boils, a couple of dried shiitake mushrooms soaked and their soaking liquid used, or a splash of soy sauce for depth. Any of these turns paste-and-water into something that tastes deliberate.
For a fully plant-based bowl, kombu and dried shiitake give you all the savory backbone you need with no fish-based dashi at all. If you cook a lot of meatless food, the vegan bowl collection has more ideas in the same warming, savory register.
The Best Add-Ins for Miso Soup

Part of what makes miso soup endlessly repeatable is that the paste is a constant and the add-ins change with what you have. Once you understand which ingredients want a quick warming and which want a minute of cooking, you can build a different bowl every day from the same jar of paste.
- Tofu: silken tofu is traditional and gives the softest, most delicate cube. Firm tofu holds its shape better if you stir vigorously. Cut it small and add it just before the miso so it warms without breaking up.
- Wakame seaweed: the classic. Use the dried flakes, which rehydrate in seconds and expand several times over. A scant teaspoon per bowl is plenty.
- Scallions: thinly sliced green onion scattered on top is the standard finish. Add them raw at the end for a fresh, sharp note.
- Mushrooms: thinly sliced shiitake, enoki, or even button mushrooms add an earthy depth and a little chew. Give them a minute in the simmering liquid before the miso goes in.
- Leafy greens: spinach, baby bok choy, or napa cabbage wilt in under a minute. Sturdier greens like kale want a touch longer.
- Root vegetables: thinly sliced daikon or carrot are common in heartier home-style bowls, but they need to simmer until tender before you kill the heat for the paste.
The rule that ties it together: anything that needs real cooking goes in while the liquid simmers, and the miso always comes last, off the heat. Quick add-ins like scallions and silken tofu can go in at the very end alongside the paste.
Miso Soup Beyond the Bowl
Once you are comfortable dissolving paste off the heat, the same move upgrades all sorts of cooking, which is a good argument for keeping a jar around. A spoonful of miso whisked into a finished broth deepens any brothy soup. Miso also makes a quick weeknight glaze for fish or roasted vegetables, a savory backbone for salad dressings, and a hit of umami in marinades. Because the paste is so concentrated, a little goes a long way, and the no-boil habit you learn making soup carries straight over: add miso toward the end of cooking, not the start, to keep its character intact. Treat your jar of paste like the flavor shortcut it is, and you will reach for it far beyond the soup pot.
Fixing Common Problems
Most miso soup troubles come from one of a handful of causes, and each has a quick fix.
- Too salty: you added too much paste, or used a salty red miso at a white-miso ratio. Stir in more warm water or unsalted broth to dilute, a little at a time.
- Flat or weak: not enough paste, or your liquid was plain water with no umami booster. Whisk in a bit more miso off the heat, or add a few drops of soy sauce or a pinch of dashi powder.
- Grainy or harsh: the soup boiled after the miso went in. There is no full fix once it happens, but straining and gently rewarming helps; next time, add the paste off the heat.
- Miso settled to the bottom: normal. Miso naturally separates as the soup sits. Just give the bowl a quick stir before each sip.
- Clumps of undissolved paste: you added it directly. Strain them out and, next time, dissolve in a ladle, strainer, or small bowl first.
Storing Leftovers
Miso soup is best fresh, but leftovers keep in the fridge for 2 to 3 days. Store it without the tofu and scallions if you can, since they soften, and add them fresh on reheating. Warm it gently and stop before it simmers to protect the miso flavor. Avoid freezing finished miso soup; the tofu turns spongy and the delicate aroma fades. If you want to plan ahead, freeze or chill the dashi or broth on its own and stir in fresh paste at serving time, which is the same logic that keeps any delicate finish at its best, much like protecting the noodles in a stored bowl of any brothy soup you mean to keep.
Frequently Asked Questions
How much miso paste do I use per cup of water?
About one tablespoon of miso paste per cup of liquid is the standard starting point. Saltier red miso may need a little less, mild white miso a little more. Start low, taste, and add more to reach the seasoning you like.
Why should I not boil miso soup?
Miso is a live, fermented food, and boiling drives off its aroma, dulls the savory flavor, and can make the texture grainy. Always turn off the heat before adding the dissolved paste, and reheat leftovers gently without letting them bubble.
Can I make miso soup with just miso paste and water?
Yes. Paste plus warm water makes a clean, quick bowl. It lacks the deep umami of a dashi base, but a pinch of dashi powder, a piece of kombu, dried shiitake, or a splash of soy sauce closes most of the gap.
How do I keep the miso paste from clumping?
Dissolve it before adding. Use a ladle and chopsticks, a fine-mesh miso strainer, or whisk it into a few tablespoons of warm liquid in a small bowl first, then stir that smooth slurry into the soup.
Which miso paste is best for beginners?
White (shiro) or mixed (awase) miso. Both are mild, forgiving, and widely available, and they make a balanced everyday bowl. Red miso is bolder and saltier, better once you know how strong you like your soup.
How long does miso paste last?
Unopened, many months past the printed date; opened and refrigerated, often up to a year. The salt and fermentation preserve it. Keep the surface covered and the lid tight, and it stays good for a long time.
The Bottom Line
Making miso soup with miso paste is genuinely a five-minute skill once you internalize three things: use about a tablespoon of paste per cup of liquid, dissolve it in a ladle or strainer so it never clumps, and add it with the heat off so it never boils. Pick a mild white or awase miso to start, build on dashi when you have it and water plus a booster when you do not, and finish with tofu, seaweed, and scallions. Keep a jar in the fridge and you are always five minutes from a warm, savory bowl, no matter how bare the rest of the kitchen looks.