How to make chicken broth comes down to one habit most home cooks get wrong: keep it at a bare, lazy simmer and never let it boil. Cover bony chicken and aromatics with cold water, bring it up slowly, skim the foam, then hold it at around 180 to 190 degrees F for an hour or more. Strain, cool, and skim the fat once it is cold. That gentle heat is the entire secret to broth that comes out clear and clean instead of cloudy and greasy.
I make a pot almost every week, usually from the carcass of a roast chicken I have already eaten. It costs me close to nothing and tastes worlds better than the boxed stuff. The recipes online will tell you to skim and strain, which is fine, but they leave out the why behind the most important steps. Once you understand what is actually happening in the pot, you stop guessing and start making broth you would be proud to ladle into anything.
Broth or stock: what you are actually making
People use these words interchangeably, but there is a real difference worth knowing. Broth is traditionally made with meat, often meat plus some bones, and simmered a shorter time, so it tastes distinctly of chicken and stays lighter. Stock is made mostly from bones, simmered much longer, which pulls more collagen and gives you a richer, more gelatinous liquid that sets up like jelly in the fridge.
For everyday cooking, broth is the friendlier, faster project, and it is what most soups want. If you want the deeper, body-rich version, my full walkthrough on how to make soup stock covers the longer bone-driven method. Today we are after broth: a clean, savory, chicken-forward liquid you can drink on its own or build a soup on, ready in a little over an hour.
What goes in the pot

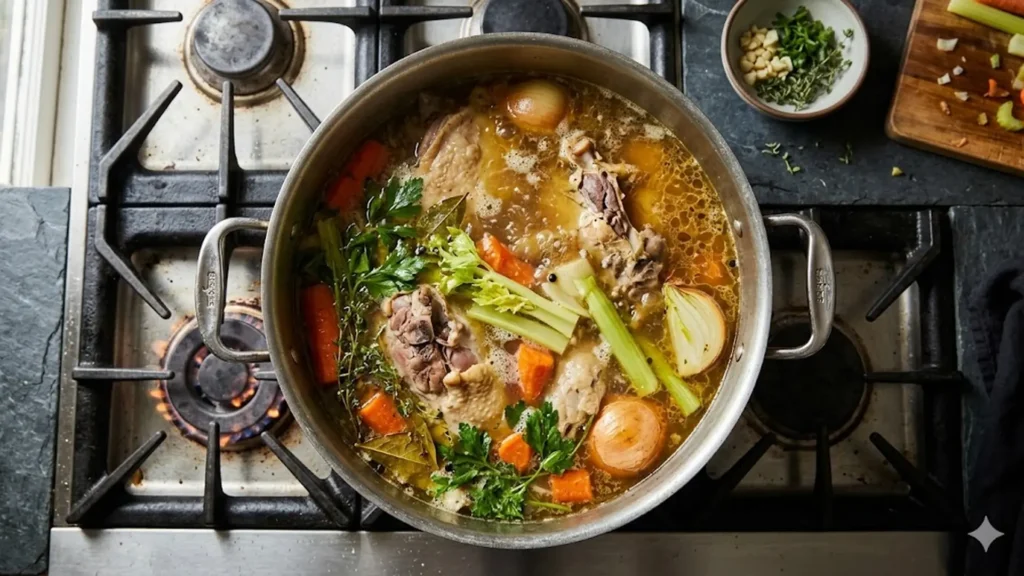
The base is simple. You need chicken with some bone in it, water, and aromatics. For a roughly 12-cup batch I use a 4 to 5 pound whole chicken or an equivalent pile of bony parts: backs, wings, necks, and leftover carcasses all work. Bones and connective tissue are where the body and flavor live, so do not use boneless breast alone or you will get sad, thin water.
For aromatics, the classic mirepoix carries it: a rough-chopped onion, two carrots, and two ribs of celery. Then a small bundle of flavor, what the French call a sachet: a few parsley stems, a couple sprigs of thyme, a bay leaf, two smashed garlic cloves, and about five peppercorns. Add salt, but go light at first, around a teaspoon, because broth concentrates as it cooks and you can always add more later. Over-salting early is hard to walk back. If you plan to reduce the broth heavily for a sauce, you might leave the salt out entirely and season only at the end, since reduction concentrates whatever salt is already in the pot. When in doubt, under-salt now and adjust later. A bland broth can be fixed, but an over-salted one is a real problem to rescue.
Start cold, and here is why it matters
Always start with cold water, not hot. This is not fussiness. When you bring chicken up gradually from cold, the proteins release slowly and the impurities rise to the top as a gray foam you can skim off cleanly. Start with hot water and you shock the proteins, locking cloudiness into the broth from the very first minute. Cold start, clear broth. It really is that direct.
Bring the pot up to a gentle boil over medium-high heat, then immediately drop it to low. In those first few minutes a layer of gray foam will rise. Skim it off with a slotted spoon or a fine mesh skimmer and discard it. That foam is coagulated protein, and removing it is what keeps your finished broth looking golden and clean instead of muddy. Spend two minutes here. It pays off in the bowl.
The temperature rule nobody mentions
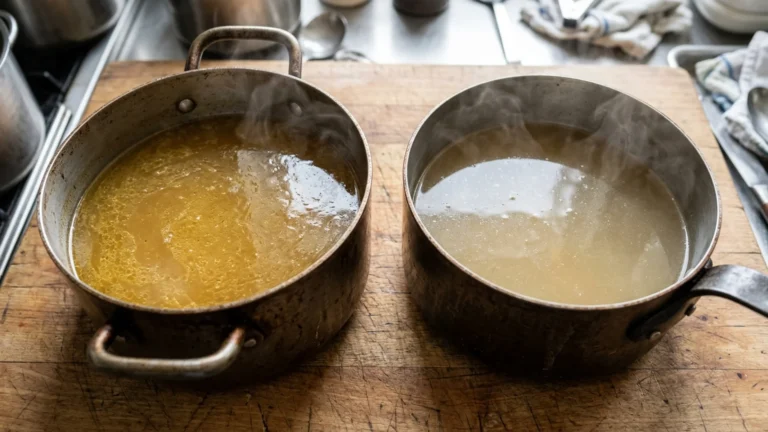
This is the step the recipe cards gloss over. After skimming, hold the pot at a bare simmer, somewhere around 180 to 190 degrees F, where you see only lazy bubbles breaking the surface every few seconds. Do not let it reach a rolling boil. Ever.
Here is what happens if you boil it hard. The violent motion emulsifies the rendered chicken fat right into the water, the way shaking oil and vinegar makes them blend. Once that fat is whipped into the liquid, you cannot skim it out, and your broth turns cloudy and greasy with a heavy mouthfeel. A gentle simmer keeps the fat floating on top as a separate layer, where it belongs and where you can remove it later. If you take one thing from this article, take this: low and slow, not a hard boil. I keep my burner on its lowest setting and adjust until the surface barely shivers.
How long, and the roast-first upgrade
For broth, simmer gently for at least 1 hour and up to about 1 hour and 15 minutes if you used a whole chicken, pulling the meat once it is cooked through so it does not turn to mush. If you are working from bare carcasses and parts rather than a whole bird, you can go 2 to 3 hours for more depth. Longer than that and you drift into stock territory.
Want a deeper, golden, more savory broth? Roast the chicken parts first. Spread your backs, wings, and carcasses on a sheet pan and roast at 425 degrees F for about 30 minutes until they are well browned, then proceed with the cold-water simmer. That browning, the Maillard reaction, builds a layer of toasty, rounded flavor that a raw start never delivers. I do this whenever I want broth for a serious soup like French onion or a rich noodle bowl. For a quick weeknight broth, I skip it. Both are good. It is a flavor decision, not a rule.
Strain, cool, and skim the fat
When the broth is done, strain it through a fine-mesh sieve, or a sieve lined with cheesecloth if you want it crystal clear. Press gently on the solids to get the last of the liquid, but do not crush them hard, since mashing the soft vegetables can push fine particles through and cloud the broth. Then discard the spent vegetables and bones. The vegetables have given everything they have and will taste like nothing.
Now cool it safely, because warm broth is a perfect home for bacteria. Get it out of the danger zone, below 40 degrees F, within a couple of hours. The fastest way is an ice bath: set the pot in a sink of ice water and stir, or pour the broth into shallow containers so it cools faster than a single deep pot would. Once it is fully chilled, the fat firms into a pale cap on top that lifts right off with a spoon. Skimming fat when cold is ten times easier than skimming it hot, which is the whole reason I almost always make broth the day before I need it.
Pressure cooker and slow cooker methods
The stovetop is my default, but two appliances make broth even more hands-off. A pressure cooker, like an Instant Pot, is the speed champion. The sealed, high-pressure environment extracts flavor fast, so you get a deep broth in about 45 minutes to an hour of cook time instead of a long stovetop simmer. Because the pot is sealed, there is no skimming during the cook, but I still skim the foam right after the initial saute or boil if I brown anything first, and the broth comes out surprisingly clear since the liquid never reaches a violent boil under pressure.
A slow cooker is the opposite, the low-effort marathon. Add everything, set it on low, and walk away for 6 to 8 hours. The gentle, steady heat is naturally kind to broth, holding it well below a hard boil the whole time, which is exactly what you want. The tradeoff is you cannot skim mid-cook as easily, so I strain and then chill the finished broth to lift off the fat and any sediment afterward. Both methods follow the same core rules. Bony chicken, aromatics, cold water, gentle heat, then strain and cool. Pick whichever fits your day.
Waste-not scrap broth

One of my favorite habits is keeping a scrap bag in the freezer. Every time I cook, the onion ends, carrot peels, celery tops, parsley stems, and leftover chicken bones go into a gallon zip bag in the freezer instead of the trash. When the bag is full, I dump it straight into a pot with cold water and make broth from what would have been garbage. It costs nothing and tastes like a deliberate batch.
A couple of cautions keep scrap broth from going wrong. Skip anything bitter or strong, like broccoli, cabbage, or brussels sprouts trimmings, which can turn the whole pot sulfurous. Go easy on too many carrot peels, which make broth taste oddly sweet. Onion skins are great and even add a golden color. Build your scrap bag around the mirepoix family, onion, carrot, celery, plus herb stems and chicken bones, and you will get a clean, savory broth that proves good cooking and thrift are the same skill.
Fixing broth that went wrong
Two complaints come up constantly, and both have clear fixes. If your broth tastes bland and watery, the usual causes are too much water for the amount of chicken, under-salting, or not simmering long enough. The fix is to reduce it. Simmer the strained broth uncovered to concentrate it, tasting as it tightens, and adjust the salt at the end. Reduction is the most reliable flavor booster there is, and it costs you nothing but a little time on the stove.
If your broth came out cloudy, you almost certainly boiled it too hard or skipped skimming the foam. You cannot fully reverse it, but you can improve clarity by straining again through cheesecloth. Next time, cold-water start, skim early, and hold that gentle simmer. The same gentle-heat principle that protects broth shows up across soup making, including in my notes on gluten free soup, where rushing the pot causes its own set of problems.
The pot that taught me the lesson
Years ago I was in a hurry and cranked a pot of chicken broth to a hard, rolling boil to speed it up. I figured hotter meant faster, and faster meant dinner sooner. An hour later I strained it and got a murky, gray, greasy liquid that no amount of skimming could rescue. The fat had been beaten into the water and there was no getting it back out. I used it because I had nothing else, but the soup it made was heavy and dull.
The next batch I babied. Cold start, careful skim, burner barely on, the surface just trembling. Ninety minutes later I had a clear, golden, clean-tasting broth that smelled like Sunday. The only thing I changed was the heat. That is the whole game. Patience does what no fancy ingredient can, and it is free.
Using and storing your broth
Homemade chicken broth keeps in the fridge for up to 4 days and freezes beautifully for up to 3 months. I freeze it in measured amounts, often in two-cup containers, and pour some into an ice cube tray for those times a recipe wants just a splash. Each broth cube is roughly two tablespoons, perfect for deglazing a pan or loosening a sauce without thawing a whole container. Leave a half inch of headspace in any container, since liquid expands as it freezes.
From there the broth becomes the backbone of almost everything: a quick chicken noodle soup, the braising liquid for beans, the base for a pan sauce, or a warm mug with a squeeze of lemon when you are under the weather. For more on building a great pot from a good broth, the team at America’s Test Kitchen has a thorough broth-making breakdown, and Bon Appetit keeps a deep library of soup techniques worth bookmarking. If you are simmering a whole bird and want to use the cooked meat, a tray of chicken pasta from Pastapeak puts those leftovers to work.
Frequently asked questions
What is the difference between chicken broth and chicken stock?
Broth is made with meat (often with some bones) and simmered a shorter time, so it tastes distinctly of chicken and stays lighter. Stock is made mostly from bones and simmered much longer, pulling out more collagen for a richer, gelatin-like body. Use broth for everyday soups, stock when you want extra depth and body.
Why is my homemade chicken broth cloudy?
Cloudy broth almost always means you boiled it too hard, which emulsifies the fat into the liquid, or you skipped skimming the foam early on. Hold the pot at a bare simmer around 180 to 190 degrees F instead of a rolling boil, and skim the gray foam in the first few minutes. Straining through cheesecloth helps clear an already-cloudy batch.
How long should I simmer chicken broth?
For broth from a whole chicken, simmer gently for about 1 hour to 1 hour and 15 minutes, pulling the meat once cooked. If you are using bare carcasses and bony parts, you can go 2 to 3 hours for more flavor. Beyond that, you cross into stock territory with a heavier, more gelatinous result.
Should I roast the chicken before making broth?
You do not have to, but roasting the parts at 425 degrees F for about 30 minutes first deepens the color and adds a toasty, savory richness through browning. Skip it for a quick, light weeknight broth. Roast first when you want a deeper broth for a serious soup. It is a flavor choice, not a requirement.
Do I have to skim the foam off chicken broth?
Yes, if you want clear broth. The gray foam that rises in the first few minutes is coagulated protein, and skimming it off keeps the finished broth golden and clean rather than muddy. It only takes a couple of minutes and makes a visible difference in the final pot.
How do I make my chicken broth taste stronger?
The most reliable fix is reduction: simmer the strained broth uncovered to evaporate water and concentrate the flavor, tasting as it tightens. Also check your salt and make sure you used enough bony chicken relative to the water. Roasting the parts first and adding a few extra aromatics both deepen the flavor too.
How long does homemade chicken broth last?
It keeps in the refrigerator for up to 4 days and in the freezer for up to 3 months. Cool it quickly with an ice bath or in shallow containers to get it out of the danger zone within two hours. Freeze in measured portions and leave a half inch of headspace since liquid expands when frozen.