Most chicken soup tastes thin because it was built backward. People reach for a carton of broth, drop in raw chicken and a handful of vegetables, boil the pot hard for twenty minutes, and wonder why the result tastes like warm salt water with chicken floating in it. Real chicken soup is not complicated, but it does ask you to respect a few quiet rules: build flavor before you add liquid, keep the pot below a boil, and treat the chicken as something to coax rather than punish. Do that, and you get a bowl with a broth that coats the spoon and meat that pulls apart in soft threads.
I have made this soup more Sundays than I can count, in a stockpot dented from years of use, and the method below is the one I keep coming back to. It works whether you start with a whole bird, a few thighs, or a leftover roast carcass. The point is not a rigid recipe. The point is understanding what each step is doing so you can adjust to whatever is in your kitchen.
What separates good chicken soup from sad chicken soup

The difference comes down to three things, and none of them cost extra money. First, you have to develop the aromatics before any liquid goes in. Onion, celery, and carrot cooked gently in fat for several minutes release sugars and form the savory base every good soup stands on. Skip that and you are stacking flavors on nothing.
Second, you have to control the heat. A hard, rolling boil tears the chicken apart, clouds the broth, and emulsifies fat into the liquid so it tastes greasy instead of clean. A bare simmer, where the surface barely trembles and a lazy bubble rises every few seconds, does the opposite. It extracts flavor slowly and keeps everything clear. According to long culinary tradition, this gentle treatment is exactly why a properly simmered chicken soup has been valued across cultures as restorative rather than merely filling.
Third, you have to season in stages and finish with acid. Salt added early seasons the chicken from the inside. A squeeze of lemon or a splash of vinegar at the very end lifts the whole pot and makes the flavors snap into focus. Without that bright note, even a rich broth tastes flat.
The ingredients, and why each one is there

You do not need a long list. You need the right list. Here is what goes in a pot that serves four to six, with the reasoning so you can swap with confidence.
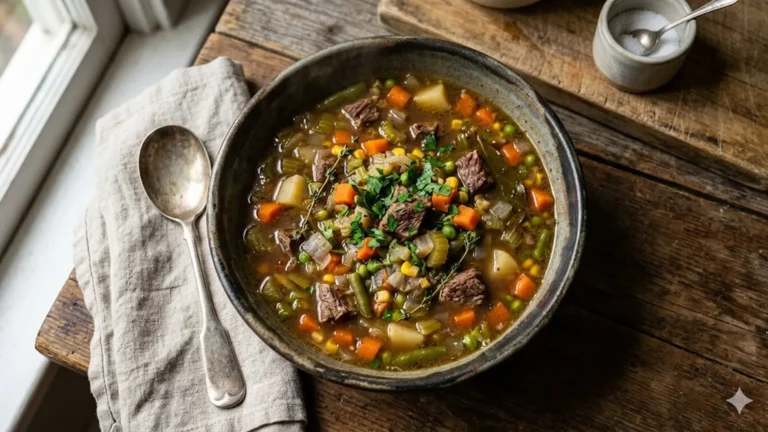
- Chicken: Bone-in, skin-on pieces give you the most flavor because bones and connective tissue release gelatin as they simmer, which is what makes a broth feel silky. Thighs are the most forgiving. A whole cut-up bird is the gold standard. Boneless breast works but gives a thinner result, so use it only when you are short on time.
- Aromatics: Onion, carrot, and celery, the classic trio. Roughly two parts onion to one part each of carrot and celery by volume.
- Garlic: A few cloves, added after the other vegetables soften so it does not scorch.
- Fat: Olive oil or a spoonful of butter to sweat the vegetables. This carries flavor and helps the aromatics release their sugars.
- Liquid: Water if you are simmering a whole bird (it becomes its own stock), or a good unsalted broth if you are using pre-cooked chicken and want body fast.
- Herbs: A bay leaf, a few sprigs of thyme, and parsley stems while it simmers. Fresh parsley leaves and dill go in at the end.
- Acid: Lemon juice or a splash of white wine vinegar, off the heat.
Step by step: building the soup
Step 1 – Sweat the aromatics
Warm the fat in a heavy pot over medium-low heat. Add the diced onion, carrot, and celery with a pinch of salt and cook slowly, stirring now and then, until the onion turns translucent and everything softens, roughly eight to ten minutes. You are not browning here. You want the vegetables soft and sweet, not colored. Add the garlic in the last minute so it perfumes the pot without burning.
Step 2 – Add the chicken and liquid
Nestle the chicken pieces into the vegetables and pour in enough water or broth to cover by about an inch. Drop in the bay leaf, thyme, and parsley stems. Bring it up slowly. The moment you see the first real bubbles, pull the heat down.
Step 3 – Simmer low and skim
Hold the pot at a bare simmer. For bone-in pieces this takes forty-five minutes to an hour; a whole bird wants closer to ninety minutes. As it heats, gray foam will rise to the surface. Skim it off with a spoon in the first fifteen minutes. That foam is coagulated protein, and removing it is the single easiest way to get a clean, clear broth instead of a murky one.
Step 4 – Pull and shred the chicken
When the meat is cooked through and tender, lift it out and let it cool enough to handle. Discard skin and bones, then shred or chop the meat. Returning the bones to the pot for another twenty minutes of simmering, if you have time, deepens the broth considerably. This is the same logic behind a proper stock, and if you want to go further it is worth learning how to make chicken stock as a standalone skill.
Step 5 – Strain, season, and finish
For a refined soup, strain the broth and discard the spent aromatics, then return the broth and shredded chicken to the pot. For a rustic, chunky soup, just fish out the bay leaf and herb stems and leave the vegetables in. Taste and add salt until the broth tastes like soup and not like water. Stir in fresh herbs and finish with that squeeze of lemon. If you are adding noodles or rice, the next section matters.
Heat control at a glance
Because heat is where most home cooks go wrong, here is a quick reference for what each stage should look like in the pot.
The noodle and rice question
The most common ruined batch of chicken soup is the one where someone cooked the noodles directly in the broth, then stored the leftovers. By morning the noodles have swollen into mush and drunk half the broth. The fix is simple: cook your starch separately and add it to each bowl, or add it to the pot only if you plan to eat the whole batch that day.
Egg noodles are traditional and cook in minutes. Rice works beautifully but absorbs even more liquid, so account for that. If you are feeding someone who avoids gluten, rice or a sturdy gluten-free noodle keeps the soup safe without changing the spirit of it. For a heartier, more substantial bowl on a cold night, some cooks even spoon the soup over a small mound of cooked pasta the way they would with a brothy chicken pasta, which gives you the comfort of both dishes at once.
How to build deeper flavor
If your soup tastes correct but a little flat, the issue is almost always depth, and there are a few honest ways to add it. Roasting the chicken pieces and the bones before they go in the pot builds a layer of savory complexity through the Maillard reaction, the browning that happens when proteins and sugars meet high heat. A parmesan rind dropped into the simmer adds quiet umami. A spoonful of tomato paste cooked into the aromatics gives body and color. None of these are required, but any one of them turns a good soup into one people ask about.
Another lever is the chicken itself. A bird that has had a little age and exercise, sometimes sold as a stewing hen, makes a richer broth than a young supermarket fryer, simply because it carries more connective tissue and fat. If you can find one, it rewards the long simmer.
Choosing your equipment and cut for the result you want
The pot matters more than people expect. A heavy-bottomed stockpot or Dutch oven holds heat steadily, which makes it far easier to maintain that bare simmer without the soup creeping up to a boil every time you turn your back. A thin pot with hot spots fights you the whole way. If a low burner still simmers too aggressively, slide the pot half off the flame so only part of the base is over the heat. That trick alone has saved more broths than any gadget.
Your choice of cut shapes the entire character of the soup. Dark meat from thighs and drumsticks stays moist through a long simmer and gives a deeper, more savory broth, which is why it is my default. White breast meat is leaner and can dry out, so if you love the look of shredded breast, poach it gently and pull it the moment it reaches doneness. A mix of both gives you the best of each: rich broth from the dark meat, tender pale shreds from the breast. And never throw away a roast chicken carcass. Tucked into a freezer bag, those bones are the start of your next pot, and they make a broth that no carton can match.
If you cook for someone with dietary needs, the method adapts without complaint. Use a certified gluten-free broth and gluten-free noodles, skip the wine in favor of plain vinegar or lemon, and the soup loses nothing. Soup is one of the most forgiving dishes in the kitchen precisely because the technique, not any single ingredient, is what carries it.
Reading the broth as you cook
Experienced soup cooks taste constantly, and so should you. Early on, the broth tastes flat and watery because the chicken has not yet given up its flavor and the salt has not had time to integrate. That is normal. As the simmer continues, dip a clean spoon in every fifteen or twenty minutes. You are tracking two things: depth and seasoning. When the liquid stops tasting like water and starts tasting like chicken, the extraction is working. When a careful pinch of salt makes the flavor jump rather than just taste saltier, you are close to done.
Fat is the other thing to watch. A thin slick of golden fat on the surface is good and carries flavor, but a thick greasy layer is too much, especially with skin-on pieces. Skim the excess with a spoon, or chill the finished soup so the fat rises and hardens into a cap you can lift off cleanly. That second method also makes the soup easier to defat for anyone watching their intake, without sacrificing the body that gelatin provides.
Common mistakes and how to avoid them
- Boiling instead of simmering. This is the big one. Boiling makes the broth cloudy and greasy and turns the meat stringy. Keep it gentle.
- Under-salting. Soup needs more salt than you think because it is mostly water. Season in layers and taste at the end.
- Adding delicate herbs too early. Parsley and dill lose their fragrance in a long simmer. Add them in the last minute.
- Cooking noodles in the pot for leftovers. They turn to paste. Keep them separate.
- Forgetting the acid. A finishing squeeze of lemon is what makes the difference between flat and bright.
Variations worth trying
Once you have the base method, the soup bends easily. Stir in a beaten egg in a thin stream for a silky, Greek-style finish, the technique behind a classic lemon-and-egg soup like avgolemono. Add coconut milk, ginger, and lime for a Southeast Asian lean. Drop in small meatballs poached right in the broth for a heartier meal. Toss in a handful of greens at the end for color and nutrition. The structure stays the same: aromatics, gentle simmer, careful seasoning, bright finish.
For a sturdier supper that still leans on the same chicken-and-broth foundation, a few gluten-free dinners built around shredded chicken and a thickened broth carry the same comfort with more staying power.
Storing and reheating
Cooled completely, chicken soup keeps well in the refrigerator for three to four days. The flavor often improves overnight as everything settles together. For longer storage, freeze it, but freeze the broth and chicken without the noodles or rice, which never survive the freezer. When you reheat, do it gently over medium-low heat until it is just steaming. Bringing it back to a hard boil only undoes the careful work you did the first time. If you want a deeper guide to portioning and freezing soup safely, our walkthrough on how to freeze soup covers the details.
The bottom line on better chicken soup
Good chicken soup is not the product of a secret ingredient. It is the product of a handful of small, deliberate choices made in the right order: soften your aromatics before the liquid goes in, keep the pot at a whisper of a simmer instead of a boil, skim the foam early, season in layers, and brighten the finished bowl with acid. Treat the chicken gently and it rewards you with tender meat and a broth that actually has body. Get those fundamentals right and you will never again wonder why your soup tastes thin, because it will not. It will taste like the kind of bowl people remember, the one that warms you from the first spoonful and gets better the next day. Once the method lives in your hands, the variations are endless and the carton in the pantry becomes a thing of the past.
Frequently Asked Questions
Can I make chicken soup with rotisserie chicken?
Yes, and it is a great shortcut. Since the chicken is already cooked, build your aromatics first, add good broth, and simmer the flavors together for twenty to thirty minutes. Add the shredded rotisserie meat near the end so it warms through without overcooking. Toss the carcass in while it simmers for extra body, then remove it before serving.
Why is my chicken soup broth cloudy?
Cloudiness almost always comes from boiling too hard, which agitates fat and proteins into the liquid, or from not skimming the foam that rises early in the simmer. Keep the pot at a bare simmer where the surface only trembles, and skim the gray foam off in the first fifteen minutes. Straining the finished broth also helps.
How long should I simmer chicken soup?
Bone-in pieces need about forty-five minutes to an hour to become tender and give up their flavor. A whole bird wants closer to ninety minutes. If you are using already-cooked chicken, you only need twenty to thirty minutes for the aromatics and broth to come together. Longer is fine for flavor, but pull the meat once it is tender so it does not dry out.
Should I add salt at the beginning or the end?
Both. A pinch early seasons the chicken and vegetables from the inside as they cook. But because soup is mostly water, you will need to taste and adjust at the end, adding salt gradually until the broth tastes like soup rather than like water. Finishing with a squeeze of lemon also makes the existing salt taste brighter.